Importing Assets
Assets are more complex to import because each is an element that’s created with either a local file or remote URL. (Feed Me supports both.)
Not only can you use Asset importing to create/upload image files, you can also use it to update them, changing things like custom fields, titles, or even filenames.
Below we’ll look at a real-world example of importing a collection of remote images into Craft.
TIP
If you’ve already got local image files ready to import, you can skip Feed Me and update asset indexes:
- Copy the image files/folders into your volume’s root folder.
- In the control panel, go to Utilities → Asset Indexes.
- Select the volume from step 1 and choose Update asset indexes.
This will scan the folder and add images into Craft as assets.
Example Feed Data
This data is what we’ll use for this guide:
<?xml version="1.0" encoding="UTF-8"?>
<Images>
    <Image>
        <Title>Feed Me Social Card</Title>
        <URL>https://craftcms.com/uploads/plugins/feed-me/_800x455_crop_center-center_none/feed-me-social-card.png</URL>
        <Caption>Some Caption</Caption>
    </Image>

    <Image>
        <Title>Craft Commerce Social Card</Title>
        <URL>https://craftcms.com/uploads/plugins/commerce/_800x455_crop_center-center_none/commerce-social-card.png</URL>
        <Caption>Another Caption</Caption>
    </Image>
</Images>{
"Image": [
{
"Title": "Feed Me Social Card",
"URL": "https://craftcms.com/uploads/plugins/feed-me/_800x455_crop_center-center_none/feed-me-social-card.png",
"Caption": "Some Caption"
},
{
"Title": "Craft Commerce Social Card",
"URL": "https://craftcms.com/uploads/plugins/commerce/_800x455_crop_center-center_none/commerce-social-card.png",
"Caption": "Another Caption"
}
]
}Choose either the XML or JSON (depending on your preference), and save as a file in the root of your public directory. We’ll assume its URL is http://craft.local/assets-feed.xml.
Set Up Your Feed
With your feed data in place, go to Feed Me’s main control panel view and add a new feed.
Enter the following details:
- Name - Property Feed
- Feed URL -
http://craft.local/assets-feed.xml - Feed Type - XML or JSON
- Primary Element -
image - Element Type - Asset
- Asset Source - General
- Import Strategy -
Create new elements, andUpdate existing elements - Passkey - Leave as generated
- Backup - Turn on
Choose Save & Continue to set up the primary element.
Primary Element
The primary element can be confusing at first, but it’s vitally important to ensure Feed Me can locate your feed’s content. Refer to Primary Element → for a detailed explanation.
Enter the following details:
- Primary Element -
/Images/Image - Pagination URL -
No Pagination URL
Choose Save & Continue to set up the field mapping.
Field Mapping
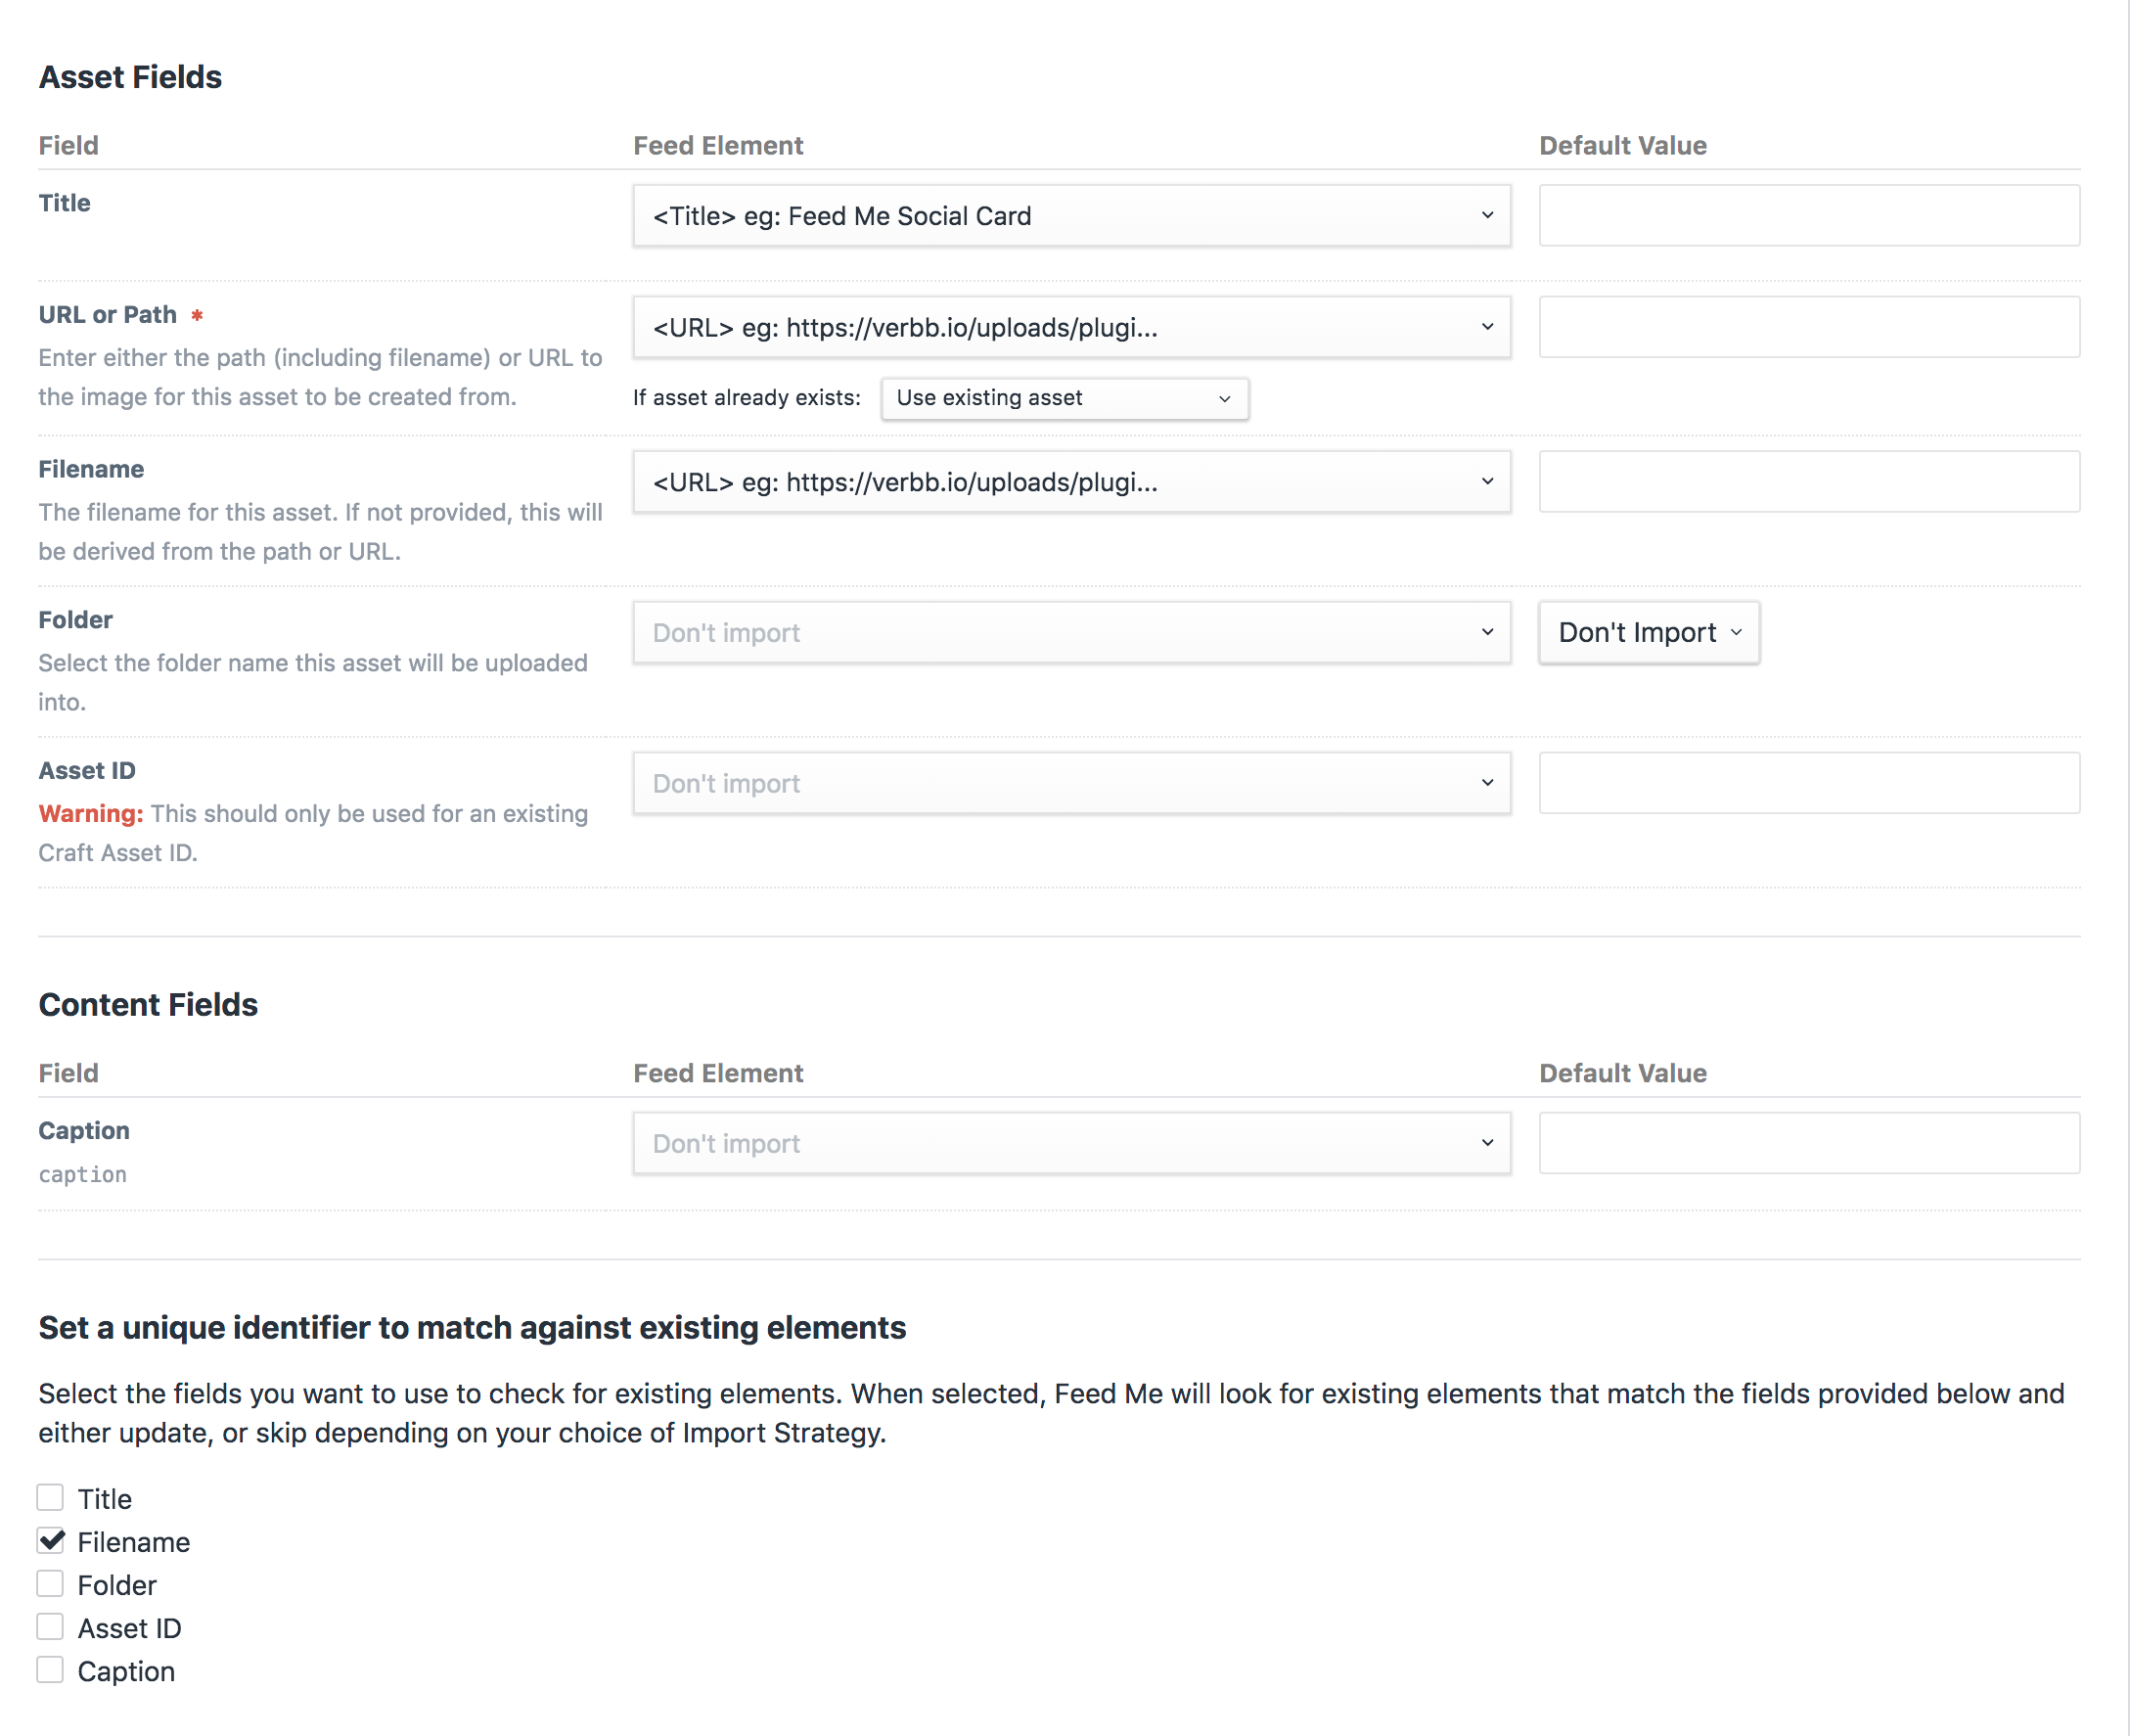
Use screenshot below as a guide for mapping data asset fields:
- We’re providing the full URL to the image to be uploaded as an asset.
- We’re telling Feed Me that if it finds an asset with the same filename to use that instead of uploading a potential duplicate.
- We’re providing the full URL again for the Filename field. Feed Me will automatically determine the filename from the URL, but you can optionally specify another node from the feed if you’d like.
- We’re checking against existing assets using their filename.
TIP
The URL or Path field will only be shown if your feed’s Import strategy includes Create new elements.
TIP
This examples uses remote URLs, but you can also provide a local path to the filename of the image you want to add. The path should be relative to your project’s web root.
For example, to-upload/feed-me.png would be a folder in your web root named to-upload with the file feed-me.png inside it.
Folders
This example imports images into the top level of the selected volume, but you may also designate the subfolder each asset gets imported to.
Import All Assets to a Subfolder
To import all the feed’s assets to the same folder, select Use default value in the folder’s Feed Element column, then select your desired subfolder in the Default Value column.
Specify an Existing Subfolder for Each Asset
Your feed can include a folder ID for each item which you can then use to determine where each imported asset ends up. Select that field from the Field Element column and optionally set a folder in the Default Value column as a fallback in case the feed’s folder ID is missing. (Invalid IDs will result in an error.)
TIP
Every folder has an ID whether it’s the top level or a subfolder, and you can find it in the database or inspecting the markup in the Assets section of the control panel. (Look for the data-folder-id attribute on menu elements.)

Choose Save & Import to begin importing your content.
Importing Your Content
Wait for the feed processing to finish. Remember, you can always navigate away from this confirmation screen.

TIP
If you’re having issues, see the Troubleshooting section.
You should now have two brand new assets in your General volume.
